More than 20-years ago, the main resource to refer for DIY PC-assembly were computer magazines and fortunately enough in Malaysia, there were both English and Malay magazines that tried to cover the subject to the best of their abilities. I remember the last PC that I built was thanks to referring to magazine articles for part recommendations and assembly guidelines, as well as the motherboard (which was a DFI, a Taiwanese brand) manual; there were plenty of connectors and jumpers to pay attention to.
A New Build
Just a couple of months ago, I started collecting parts for what was to be a new build centered around a very striking Small-Form Factor chassis. This build has the distinction of being the first built-from-scratch PC project I’ve done in over 20 years.
So what’s a SFF PC? It’s basically a PC utilizing a casing that has a small footprint, usually allowing for a Mini-ITX motherboard, along with a SFX power supply unit. SFF PCs come in all kinds of unique shapes and sizes, so what’s so special about the chassis that I chose for this build?

Introducing the Teenage Engineering Computer-1
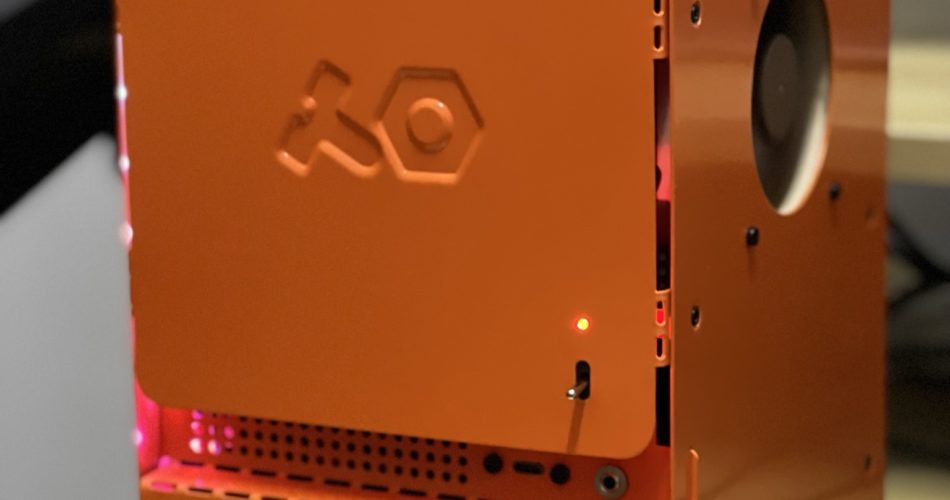
The chassis is very unique, a product of Teenage Engineering, a manufacturer well known for making really cool-looking music synthesizers such as the OP-1. The case that I’m using is Teenage Engineering’s first foray into computer case manufacturing, and it’s called the Computer-1. In fact, I was actually looking at the OP-1 before I noticed the Computer-1.
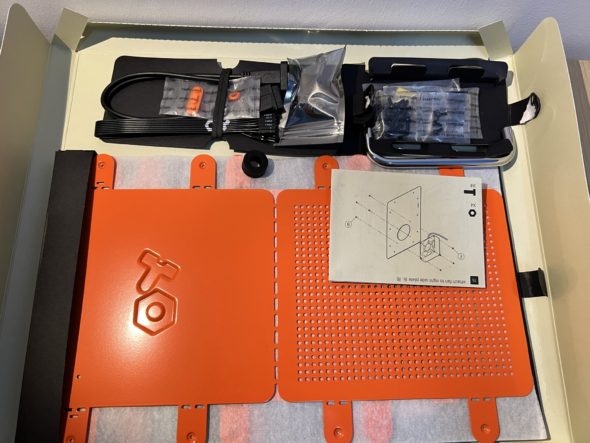
Consisting of aluminum sheets powder-coated in RAL 2004 Pure orange, Computer-1 is shipped flat-packed ala IKEA furniture (with similar, minimalist instructions) and unlike other PC cases, you’ll need to assemble Computer-1 by folding the aluminum yourself, and adding your parts such as the motherboard and PSU before combining all the parts together. If you are using a GPU, you’ll actually TEAR off a portion of the aluminum to fit your GPU in (as per the instruction manual).
The aluminum isn’t too difficult to bend, just find a nice table edge to do so but the manual does remind you to “think twice and bend once”, presumably to prevent having to deal with metal fatigue. The case does impose certain restrictions on what parts that you can use with a mITX motherboard and SFX PSU being obvious requirements.
CPU of Choice
My build policy has always been to go for the most powerful CPU that my budget will permit, and I went with the latest 12th-gen Intel® Core™ i7-12700KF processor. The processor captures the approach taken by Intel with the new Alder Lake processors perfectly, with 2 different types of processor cores and being a K-part, it is unlocked. It also offers up excellent gaming performance with great thermals, second only to the 12900K which runs really hot. The Ryzen 5000-series processors were not up to consideration as the processors and the AM4 platform are already long-in-tooth.
Motherboard and RAM
While Intel 12th-gen supports DDR5 RAM, I decided to go with a motherboard featuring a B660I chipset with DDR4 RAM support, saving a ton on both components. The Gigabyte B660I Aorus Pro DDR4 is a mITX motherboard with excellent VRM and support for Type-C USB connectivity. The only drawback that I can think off is that the motherboard only accepts 1 M2 NVMe drive. As for RAM, I went with a pair of 16 GB sticks from TEAMGROUP.

Graphics Card
The Computer-1 chassis does impose some restrictions on what GPU you can use in your build. The chassis supports cards that are dual-slot up to 180 x 130 x 40 mm. I’ve seen one user post up a build featuring a MSI Aero ITX graphics card which is at 43 mm, but since I couldn’t find one, I settled for a Palit GeForce RTX 3050 StormX GPU.
Cooling
Computer-1 provides a cutout on the side of the case for one case fan. I opted for a 80-mm Noctua NF-A8 quiet case fan along with a low profile Noctua CPU cooler. The NH-L9i-17xx may seem like a poor match for an unlocked i7 processor, but I’m not doing anything particularly crazy with the CPU in the first place. Furthermore, the Computer-1 favours low-profile CPU coolers with a height limit of 120mm from the motherboard’s surface.
You may notice that there are plenty of vents and gaps in the Computer-1 case, but what I intend to do with the NF-A8 fan would be to introduce positive air pressure inside the chassis to prevent all the vents and gaps from sucking in dust.
Storage
The sole M2 NVMe slot is occupied by a 1 TB WD Black SN770 drive. This is a well-reviewed drive which offers up fast performance and very good pricing.
Parts List
Here is the complete list of parts:
- CPU: Intel Core i7-12700KF 3.6 GHz 12-Core Processor
- CPU Cooler: Noctua NH-L9i-17xx 33.84 CFM CPU Cooler
- Case Fan: Noctua NF-A8 PWM
- Motherboard: Gigabyte B660I AORUS Pro DDR4 Mini ITX LGA1700 Motherboard
- Memory: TEAMGROUP T-Force Vulcan Z DDR4 32GB Kit (2x16GB) 3200MHz (PC4-25600) CL16 Desktop Memory Module Ram (Red)
- Storage: Western Digital Black SN770 1 TB M.2-2280 NVME Solid State Drive
- Casing: teenage engineering Computer-1
- Video Card: Palit GeForce RTX 3050 8GB 8 GB StormX Video Card
- Power Supply: FSP 650 Watts
The Build Experience
It took me a total of 3 hours to finish this build. The main challenges can be summed up in three major areas: getting the folds right, getting the front audio jack to work and lastly, cable management.
Like I’ve mentioned earlier, you can use the edge of a table to help with the folding. The idea here is to make sure you can follow the instructions to a T. Also you ought to follow the pro-tip to pre-thread the screw holes first.
The front audio jack has three cables that you’ll need to connect to your motherboard, but this may not be enough to get it to work the first time around. In my case, I had to install the Realtek audio drivers for my motherboard and tweak some settings that actually disabled the front jack!

Cable management is a challenge for any build, but more so for an SSF one, and the main reason that you’ll want to get it right as soon as possible for this build is because you need to remove 10 screws just to open up the side panel!
Post Build Report
I decided to name the new build as “Orange Crush”. Currently I’m testing the build by playing a fair bit of Halo Infinite. It runs the game at an average of 60 FPS with graphics set to high at Full HD. While the new Intel processor is able to eat my gaming rig’s lunch, as a whole, Orange Rush hasn’t been able to beat that rig.
I’ll be handing this off to my youngest daughter once I’ve completed testing.